Great article from Service Alley's blog!
5 + 1 Easy Kitchen Remodels That You Can Have Ready Before Thanksgiving
So it may be a little early to start talking about Thanksgiving. I,
personally, think it is (I’m still sweating from my commute to work this
morning), but one thing is undeniable: we tend to start thinking about
fall holidays when summer’s over. Maybe it’s the fact that, after Labor
Day, we don’t get any more days off until then. Regardless, in the
coming weeks, you’ll likely start dreaming of snow, evergreens, lazy
Sundays, and family-fist-fights.
Want to stun your holiday visitors into submission this year? Doing
just a bit of remodeling can reinvent your kitchen, your cooking and
your reputation as a host. My wife and I did it last year and, instead
of Dad’s usual ‘pleasantries’, he and Mom couldn’t get over one thing:
how did you do this in such a short time?
It’s true, my parents make two yearly visits to our home: one during
the beginning of August (for reasons that completely escape me) and one
for Thanksgiving. And in the short period of time between visits, for
relatively little money, we’d completely reinvented our kitchen. Now,
when I say reinvented, I don’t mean we knocked out walls, bought pricey
new appliances, or put in new windows. No. I mean, c’mon, I’m a blogger.
Instead, we did these five things that completely changed our space.
Some we contracted out, some
we did ourselves (I mean, you’ve got to know your limits, right?), but
they were simple, relatively painless (except when I fell off the ladder
painting cabinets) and surprisingly affordable.
The plus one (which stands out like a sore thumb because, c’mon, six) is one I’m undertaking this fall.
Thanksgiving is less than 90 days away! Here we go:
1. Chalkboard Wall:
I know this is super-popular now, but I like to think my wife and I
did it before it became so (we didn’t; I’m just being wishful). And it’s
popular for good reason. It’s cheap, versatile, and instantly
modernizes (to some degree) any space that it’s in. Simply pick a wall,
go to a store that sells paint, buy a can of chalkboard paint (it’s
usually somewhere around the spray paint), and paint on two coats. We
didn’t use primer (you can), but two coats is typically necessary and
really renders the primer kind of unnecessary. After you let it dry,
the sky’s the limit on what you can actually do with it: meal plans,
reminders, inspirational poems (I recommend “Western Wind”), drawings.
Really, whatever you need it for. And it can change if, say, your kid
needs an impromptu math lesson or you’ve always wanted to have a fancy
menu for your Thanksgiving feast. Here’s your chance to show everyone
the writing on the wall. The best part is that, when you out-grow it
(like that could ever happen), you just paint over it.
2. Replace Your Countertop:
I know this seems like a hassle. Surely, your laminate counter-top
can hang out for another year, collecting stains and wear. I thought
mine could. My wife, however, told me otherwise. And after doing a bit
of research, it started to seem pretty feasible. We elected to go with a
quartz top, but the one that we really,
really lusted after was
actually made of concrete. The cool thing about concrete is that it can
be poured in any shape, and any design details you want can be set
directly into it. Now, deciding between the two is really just a matter
of taste; if your home style is more traditional, you might go with
quartz. However, if you find yourself favoring that modern/industrial
look, concrete might be your best bet. Both of these are nearly
comparable in strength and price, require little maintenance, and can
easily be purchased and installed by the holiday (as long as you get on
it like now). While, obviously, I can’t quote you exact prices, I can tell you that quartz runs about $3-4K (depending on quality) and concrete runs $3.5-5K. At first I thought
I’ll save us on installation and do it myself. That was stupid. Really stupid. Unless you or someone you know someone does this professionally, do yourself a favor and hire a contractor.
Really, the installation itself costs about $300 max. It’s worth it. I
almost destroyed the countertop and was nearly crushed to death in the
process.
3. Paint Your Tile Backsplash:
In my last apartment, there was this completely gruesome backsplash.
It must have been installed in 1981 when Norman Rockwell-style fruit
basket sketches were a thing one might want to look at every morning.
It drove me insane. The deal my wife made with me was, as long I didn’t
complain about it EVERY DAY, when we got a home of our own, it would
never have anything like that in it. Fast-forward to us finding our
dream starter home last year, complete with IDENTICAL backsplash. I
thought this was a dark, cosmic joke, that someone out there was really
living it up at my expense, that I was doomed to be followed by ugly
flowers against a nicotine-yellow tile… and then I read that you can
paint a backsplash to look however you like. So I did that. It’s really a
fairly simple process:
- Buy some oil-based, semi-gloss paint of your preference and a gallon of Adhesion Primer (do not omit this)
- Scuff the backsplash with sand-paper. Do this a lot, until it’s no longer smooth
- Apply two coats of Adhesion Primer (again, DO NOT OMIT THIS)
- Let primer dry and then roll on two coats of that oil-based, semi-gloss paint you bought.
- Enjoy your new backsplash.
4. Change out your hardware:
This is honestly something that wasn’t even remotely on my radar
until I met my wife. It never occurred to me that all those cabinet and
dresser knobs were actually screwed into the furniture and could be
removed/changed out. The first time I took one off, I showed her proudly
while she gave me that look that only a smart person who loves an idiot
can give. Needless to say, I’ve been pretty excited to change hardware
since then. Mostly because it’s easy, cheap, and can be a real
game-changer. If you’re looking for micro-design details to accentuate
the larger-scale stuff you’ve already done, this is your calling.
Depending on your budget, you can get hardware at a variety of places
(stores like Home Depot or Lowes, specialty stores with home sections
like Anthropologie, or online from sites like Knobs N Pulls)
and, if you look enough, you’re guaranteed to find one that fits your
home. And, I mean, even if the one’s you select don’t have the same
measurements as your current ones, simply drilling new holes/widening
current ones will get the job done. If you accidentally drill a hole in
the wrong spot on your cabinet (guilty), or just have a handle-to-hole
mismatch, you can find wood filler at a local hardware store that
matches the wood tone of your cabinet, or that you can stain to match it
in just a few minutes.
5. Spruce up your cabinets (or replace them entirely):
At this point in my career, I’m a sprucer. Now, some of you may be replacers,
and more power to you; please know that I envy you from the bottom of
my everything. If you’re a replacer, you’ll need to get started on this
now. While it’s totally feasible to have your cabinets replaced by
Thanksgiving, the process can take some time, so the sooner you get
started, the better. Now if you’re a sprucer, boy do I have some good
news for you (not really). Cabinet painting can be a pretty involved
process, but is very approachable. You’ll need to remove all doors and
hardware, sand everything, and get plenty of the paint you want before
you get started. There really isn’t a secret to painting things—sand
surface, apply paint, allow to dry, reapply paint, allow to dry—but, if
you’re an advanced sprucer (or just one who really hates paint-brushes),
you can apply a spray-on finish instead. I don’t know a whole lot about
that, but here
is a very solid how-to. Either way, taking time to do this process
carefully and correctly will leave you with stunning, inexpensive
results (but you’ll be really tired). Also, from my experience, if you
can’t quite reach the corner of a cabinet from the ladder you’re
standing on, get down and move the ladder. Otherwise, you could become
much more intimate with the fridge, then the ladder rung, then the floor
than you might otherwise care to be.
If you complete these things before Thanksgiving (I did, but, I was
otherwise only sporadically employed at the time), two things will
happen: 1) you will feel like a champion, a real Sean Connery or Lucy
Lawless and 2) your kitchen will look completely different, brand new.
If you don’t have the time to do all of them, don’t worry. Pick and
choose what’s going to work best for you. Pair them, if you like.
Anything will help (though any of the painting tasks will make more
dramatic differences than if you, say, change your hardware.) What’s
most important is that you get your space back, really make it yours,
and maybe stifle some holiday drama in the meantime…
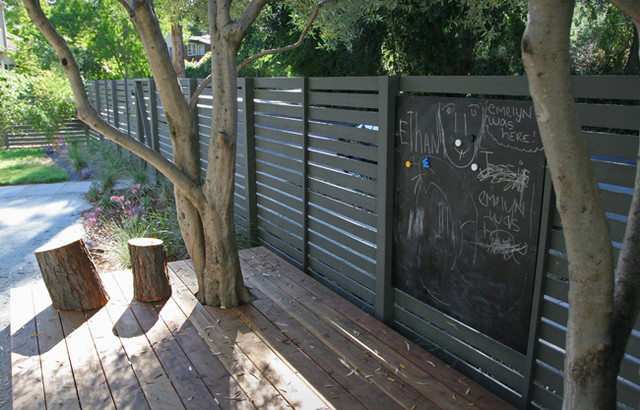
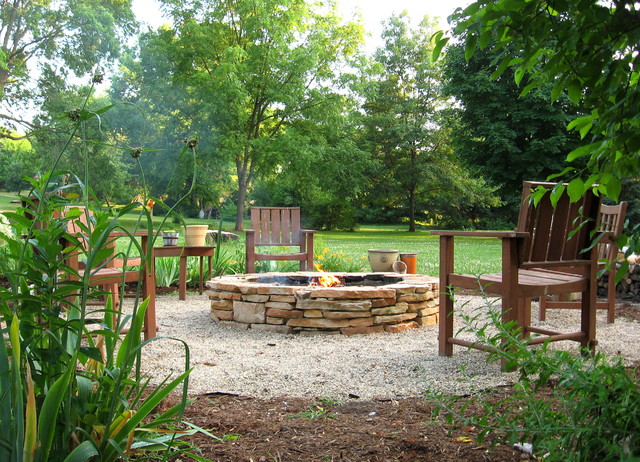
PLUS ONE!!!
I’m sure you thought I forgot. I mean, really, I’ve already
concluded, and this seems almost unnecessary. But I’m so excited about
doing it that I just can’t resist. This year, I’m going to build AN
OUTDOOR FIRE PIT! Both my and my wife’s parents had these when we were
kids, and we’re both so really looking forward to carrying on some of
those memories. On holidays, my family would gather around, drink mulled
wine, and talk. My wife’s family would cook a whole animal over theirs
(they’re obviously from a much more exciting culture than I am). So this
fall, you’ll be able to find me in the backyard following this DIY tutorial. I’ll probably let you know how it goes unless I fail hard. Or if I undercook the turkey out there (because
of course I’m cooking our turkey there.)
For more information about Remodeling Hell, CLICK HERE
To order a copy of my book Murder on Kilimanjaro, CLICK HERE
For more information about the Summit Murder Mystery series, CLICK HERE
*article from servicealley.com blog