Showing posts with label Charles G Irion. Show all posts

Friday, April 22, 2016

6 spring chores to do now to protect your home's value

As of early Sunday morning on the East Coast, spring officially has sprung. But before you break out in your happy dance, you've got some work to do.   To protect what's probably your biggest investment, it's important to take care of a few spring chores. Nino Sitchinava — principal economist at Houzz.com, a leading platform for home remodeling and design — offers her top tips for getting your property back in shape after winter:
1. Tackle any drainage issues. The 2016 Houzz Landscaping Trends study revealed that drainage issues are the top challenge homeowners face when updating their yards. After winter, you likely know where excess water pools around your home. Spring is the best time to fix this to avoid erosion and mold issues.

2. Fix a leaking roof. During winter, it's common to patch or tarp a roof as a temporary fix for leaks, but now is the time to resolve issues for good. According to the 2015 Houzz & Home study, which had more than 170,000 respondents in the U.S.,  homeowners are nearly two times more likely to remodel their kitchen (27%) than roofing (15%), an important update when needed. "Fixing leaks and maintenance repairs should be prioritized ahead of other remodeling," Sitchinava says. "Leaks can cause problems like pests and mold. Often these repairs are also lower budget and require less planning."
3. Refresh your entry or mudroom. During winter, you're likely to track snow, road salt and mud into your entry or mudroom. In spring, make sure to thoroughly clean your walls, floors and doors to avoid any long-term damage.

4. Clean and repair gutters. Winter debris can build in gutters, and it's important to remove it before spring rains. To avoid water running down the side of your home, check for places where the gutters may have pulled away from the house. "Termites and other pests, which become most active during this time of year, are attracted to moisture," Sitchinava says. "Standing water can create mold issues and cracks in driveways and paths create tripping hazards."

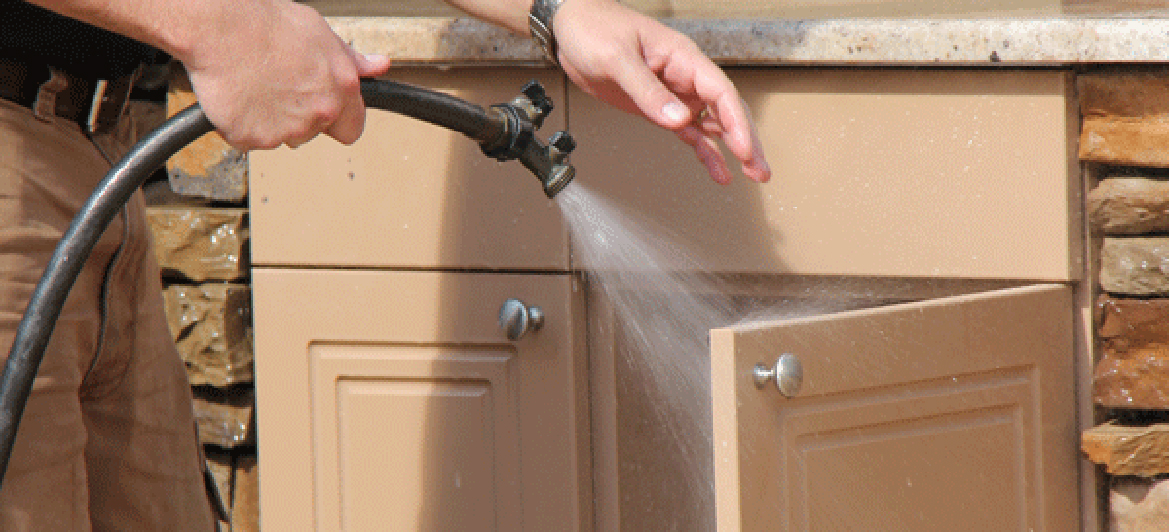
5. Clean siding. Similar to your entry or mudroom, salt and mud can build up on the exterior of your home during the winter. Depending on the type of siding, you can use a hose or pressure washer to clean your siding.

6. Update paths and your driveway. Often driveways and paths crack during the winter, especially in regions that experience freezing conditions. During landscaping projects, more than half of homeowners update their paths (51%) and 17% update their driveways, according to the 2016 Houzz Landscaping Trends study.

"Often, it's not an option to resolve these issues during the winter because it's too cold to have workers on site and there may still be snow on the ground in colder climates. So, it's important to address them ASAP in the spring."

To order your copy of Remodeling Hell, CLICK HERE
For more information about Remodeling Hell, CLICK HERE
For more information about the Summit Murder Mystery series, CLICK HERE
Follow me on TWITTER
Friend me on FACEBOOK
Follow me on PINTEREST

Tuesday, April 19, 2016

Tips for building an outdoor kitchen for clients


Outdoor kitchens have been growing in popularity over the years. The benefit of learning how to build an outdoor kitchen is that the profit margins are traditionally higher than standard indoor kitchen remodels given that the select group of contractors with the skill of installing them is small and their services are in demand.

The outdoor kitchen is comprised of four distinct zones: the hot zone, which is where your grill, cook top and pizza oven goes; a wet zone, which is where your sink goes; a cold zone where you keep your cooler or refrigerator; and a dry zone, which is where you want to keep cooking and storage items dry.

Of all the zones within the outdoor kitchen the dry zone requires the most specialized equipment. Special water-tight  and water-resistant cabinets will need to be put in to keep storage items dry. Among the offerings are NatureKast high-density resin and Werever marine-grade HDPE cabinetry that are so impervious you can clean them with a water hose. Kalamazoo also makes beautiful stainless steel cabinets and appliances for the outdoors.
 
Werever marine-grade cabinetry
In regards to appliances for an outdoor kitchen, Kalamazoo makes the nicest, most durable appliances you can buy. They make warming drawers and side burners. They even make outdoor dishwashers, which is a real luxury item if you think about it.

Another aspect of building an outdoor kitchen is to select the right grade of tile. Tiles that work best outside are high-grade porcelain tiles, which are nearly impervious to moisture, and quarry tiles that are highly durable in structure. Another building material you can consider working with is stained concrete with a durable layer of polymer coating.  If you choose to stamp the concrete you want a very low stamp level, which will make cracking less of likelihood. Also if you want to put wood deck flooring in your outdoor kitchen, pick the most water-impervious grade of wood you can. Epay wood is a highly recommended outdoor wood flooring option. Remember sourcing the most durable materials you can and paying more initially is better in the long run as the life of the kitchen can be extended into many decades of time.

Although many keep the outdoor kitchen as closely adjacent to the indoor one as possible, it should not be relegated to just the backyard. You can put outdoor kitchens on the roof as well.
Building an outdoor kitchen is not a necessity but it is a luxury symbol. Many homeowners appreciate what an outdoor kitchen can provide in terms of entertaining guests, and may be eager to have one custom built.

To order your copy of Remodeling Hell, CLICK HERE
For more information about Remodeling Hell, CLICK HERE
For more information about the Summit Murder Mystery series, CLICK HERE
Follow me on TWITTER
Friend me on FACEBOOK
Follow me on PINTEREST

Wednesday, August 7, 2013

Five Things to Know Before Beginning Your Bathroom Remodel

Our very own Patricia Davis Brown was featured in the magazine Design Bureau, sharing her expertise on remodeling your bathroom. Learn from Patricia the 5 things to know before beginning your bathroom remodel:

 HAVE A PLAN

“Most people make the mistake of going to the builder first, but a professional plan puts the ball in your court. This allows the homeowner to get accurate bids and be able to determine if the project is in their budget. If you find you’re out of budget, then you are able to value engineer it by substituting less expensive materials to bring the cost into budget.

DON’T FORGET THE LIGHTING

“Every room needs good lighting, but the kitchen and bathroom are the rooms that need a layered lighting plan. A layered lighting plan covers general lighting, task lighting, and ambient lighting for the multiple purposes of a bathroom.”

DO YOUR RESEARCH

“You do not want to date yourself on a brand new remodel by putting in last year’s trends, so stay on top of the latest products and technologies for the bathroom. One of the good things about using a professional designer is they are in the know on the latest looks and will bring them to you.”

BE PREPARED FOR BIDDING

“I recommend bidding with three different builders or subcontractors so you can get a good picture of what the bids should be. And remember, the lowest bid is not always the right one.”

ASK FOR REFERENCES

“A full bathroom remodel takes about three months to complete in full, so you want to make sure that you pick the right contractor to work with. I always recommend asking for three references before I consider hiring such an important person. And before you meet with anyone, make sure they are licensed and insured.”


To order your copy of Remodeling Hell, CLICK HERE
For more information about Remodeling Hell, CLICK HERE
To order a copy of my book Murder on Kilimanjaro, CLICK HERE
For more information about the Summit Murder Mystery series, CLICK HERE
Follow me on TWITTER
Friend me on FACEBOOK
Follow me on PINTEREST 

*article source digthisdesign.net

Friday, February 15, 2013

Six Tips for Your Next DIY Home Painting Project

Thanks for reading today's blog post!  Did you know that I'm the author of not just one, but thirteen books?  For more information, please visit www.charlesirion.com, www.irionbooks.com and/or www.summitmurdermystery.com


Whether you hire professionals or tackle the work yourself, few things are more stressful than home improvement projects. Although the thought of undertaking a job yourself can be intimidating, licensed contractors can cost much more than expenses incurred during a DIY project.

Even if you don't have any experience with a brush or roller, painting the rooms yourself can be a great way to save big and spruce up your home. A small investment in paint and supplies and a little bit of your time are all you need. But before you throw on those old overalls, be warned: home improvement projects require a lot of patience and preparation.

Here are six tips that can help you tackle the job properly and efficiently:

1. Prepare Properly
The common rule of thumb for home improvement projects is the seven Ps: "Proper Prior Preparation Prevents Poor Performance." Tape off your ceilings and baseboards with blue painting tape. Sandpaper the walls to ensure an even coat, and wipe them clean to eliminate debris. Next, lay down some protective matting or newspapers to protect your floors. Remember, your goal is a smooth, finished coat of paint on your walls -- not a home that looks like it was designed by Jackson Pollock.

2. Invest in Quality Paint
The last thing you want to do is let your paint dry, move your furniture back in, and then realize you need to repaint because you chose the cheapest brand of paint in the store. Consult the professionals at your local paint or hardware store to determine the best quality product available at the best price.

3. Spend the Extra Money on Brushes
Brushes can cost anywhere from $5 to $30 apiece. Don't purchase the cheapest ones available -- instead, invest in mid-range quality brushes for medium-scale home painting projects. They hold up well, and if you clean and store them properly, they'll be usable for many future painting projects.

4. Coat Well
With a good coat of paint, the color stands out and imperfections on the walls are better camouflaged. Don't be afraid to dunk your brush all the way into the paint can and apply liberally to the surface. Do-it-yourself newbies and experienced professionals alike should give a wall at least two coats of paint, so make sure you let that first coat dry for at least four hours before applying the second.

5. Only Buy What You Need
Most experts recommend one gallon of paint for every 400 square feet, so measure the surface area of your project to determine how much paint is required. Purchase a little extra to be used in the future when you need to do touch-ups, but don't go overboard. The last thing you need to do is blow money on gallons of unneeded paint that will only end up in storage.

6. Register Your Color
When you purchase paint, most stores offer to create an account for you that can be used to register your color in case you need it for future projects. Rooms that experience high traffic, such as kitchens and living rooms, often require touch-ups every few years. Instead of having to match your color to a swatch or rely on a photo and a salesperson's interpretation, register your color and you'll be able to purchase an exact match when the need arises.

Final Thoughts
When planning your time-frame for a home painting project, do yourself a favor and double your original estimate. Unexpected surprises are sure to occur, and you should not feel rushed to complete your job. If you plan well, you can save a lot of money and have some fun as well.

To order your copy of Remodeling Hell, CLICK HERE
For more information about Remodeling Hell, CLICK HERE
To order a copy of my new book Murder on Kilimanjaro, CLICK HERE
For more information about the Summit Murder Mystery series, CLICK HERE
Follow me on TWITTER
Friend me on FACEBOOK
Connect with me on LINKEDIN

Article source: Huffington Post

Wednesday, January 23, 2013

Top New Year's Resolutions for Your Home


Home Improvement Projects 2013

The start of each new year is a hopeful time. People vow to get to the gym more often or to finally quit smoking. But as winter turns to spring, even the most steadfast determination can begin to wane, and resolutions often get sidelined. The same is true in remodeling. There always seem to be things on our wish lists that we never get around to.

We spoke with three experts to identify the home improvement projects most of us think about but rarely tackle. And we got tips on how to finally get these projects done.


1. Making Our Homes More Energy Efficient
Home Improvement Projects 2013 - Energy Efficiency

Bob Vila knows a thing or two about the home improvement projects people dream about. One that he hears mentioned frequently is increasing a home’s energy efficiency. “People often ask me about energy conservation methods, from installing a programmable thermostat to adding insulation in an attic to replacing old windows and doors,” he says.

Why It’s Important: Boosting your home’s energy efficiency saves you money—a common resolution in and of itself!

What Holds Us Back: Budget concerns can be roadblocks to success, Bob points out, but they don’t have to be. “There are $50,000 window replacements, but there are also options as inexpensive as a tube of caulking to seal out drafts.”

How To Get It Done: “Take a realistic look at your finances and start with what you can afford,” Bob advises. “For larger projects, you may have to adjust your priorities in order to save money, like taking a one week vacation instead of two weeks.”

2. Remodeling a Kitchen or Bath
Home Improvement Projects 2013 - Kitchen and Bath

Modernizing an outdated kitchen or bath is a project that Amy Matthews, licensed contractor and host of DIY Network’s hit show “Sweat Equity,” is asked about time and again.

Why It’s Important: Aside from the aesthetic qualities, a beautiful new kitchen or bath can increase the value of your home.

What Holds Us Back: “I think people feel overwhelmed by the scope of these projects,” Amy reflects. “There are other rooms you can renovate for less money, but kitchens and baths can involve plumbing, gas lines, fixtures—they are expensive places to fix.”

How To Get It Done: “Begin by making a detailed plan of your dream room, but be realistic about the costs,” Amy says. To have the stove of your dreams, for example, you may need to compromise on cabinets—or the other way around. “A good contractor will be able to help you adjust your plan to fit your budget.”

3. Conquering Clutter
Home Improvement Projects 2013 - Storage and Organization

“Getting rid of clutter and finally getting organized is always on our readers’ list of New Year’s resolutions,” reports Amy Panos, Senior Editor for Home Design at Better Homes & Gardens.

Why It’s Important: Clutter-free spaces not only help you save time by making it easier to find what you need, they also foster an overall sense of serenity in your home.

What Holds Us Back: The urge to get it done all at once. “Remember, you didn’t accumulate the clutter in a day, and you’re not going to organize your whole house in a day,” Amy says.

How To Get It Done: Start small. “Think about the three areas that, if you could get them organized, would make the biggest difference in your daily life,” Amy suggests. “Work on one of them each month, even if it’s only for an hour a week. Focus on one and work on it until you finish, then move on to the next one. Let success breed success.”

To order your copy of Remodeling Hell, CLICK HERE
For more information about Remodeling Hell, CLICK HERE
To order a copy of my new book Murder on Kilimanjaro, CLICK HERE
For more information about the Summit Murder Mystery series, CLICK HERE
Follow me on TWITTER
Friend me on FACEBOOK
Connect with me on LINKEDIN
   

article source: bobvila.com

Monday, December 31, 2012

Common Sense Safety Tips for DIY Home Projects

It’s important to keep up with home maintenance jobs in order to protect your home investment and have a safe living area. Many of these maintenance jobs also save money when you do-it-yourself. It’s important, however, to follow a few common sense safety precautions.


For instance, keep your work area neat. Don’t allow power cords to tangle and pick up and properly store power tools, sharp tools, or dangerous materials that might cause injury. And keep tools and supplies away from the reach of small children.


Dress appropriately for these do-it-yourself projects. For instance, wear sturdy clothing, work boots, and gloves to help protect you as you work. Be sure to wear safety glasses whenever you use power tools, hammers, or other striking or cutting tools. If you’re sanding wood or wallboard joint compound, wear a dust mask to avoid breathing the dust and fibers. If you’re working with hazardous chemicals and materials, a certified respirator is a must.


Before using any power tool, be sure to read and follow all precautions given in the manual. Always unplug the tool before servicing it, making adjustments, and when you’re finished using it. It’s also safety wise to keep all drill bits, blades, and cutters sharp since dull tools require extra force and makes them more dangerous to use.

Whenever you’re using a ladder, be sure to position it on a flat, firm surface. As you climb or reach, keep your weight centered and avoid standing on the top two runs.


Last but not least, keep a good first-aid kit on hand.


Good luck to all starting new home projects in the New Year!

To order your copy of Remodeling Hell, CLICK HERE
For more information about Remodeling Hell, CLICK HERE
To order a copy of my new book Murder on Kilimanjaro, CLICK HERE
For more information about the Summit Murder Mystery series, CLICK HERE
Follow me on TWITTER
Friend me on FACEBOOK
Connect with me on LINKEDIN
 
Article source: newsdemocratleader.com

Wednesday, December 12, 2012

10 Tips to Help You Focus on Home Projects


Tools


If you have a home, I guarantee that you have home improvement projects to do. Whether relating to season, maintenance, upgrades, or repairs, there is rarely a time when the list is empty. Some of us find the motivation to complete home projects easily, while others stop, start, re-start, or generally procrastinate. There are a variety of reasons why you might have trouble following through on projects. Not surprisingly, many of them are emotionally based. Sometimes you have to do some inner work before there is a prayer the outer work will actually be completed. Here are a few tips, both psychological and practical, to help you focus and follow through on projects.


1. Look at why you are doing the project to begin with.
“There is a conflict inherent in what we want and what we think is OK,” said Kevin Blanchard, MSW, who practices in Greenfield, MA. Blanchard said that people can have many reasons for wanting to do a project, one of which is to give others a certain impression of you or you feel you must to make your partner or others happy. “Some people want to be seen as someone who has freshly painted walls. Or is it your wife or mother’s idea? You have to ask yourself what you really want to do,” said Blanchard.

2. Prioritize.
“Thinking on paper and on a calendar is helpful when you have a list of projects,” said Marek Tresnack, LMHC, who also has a practice in Greenfield, MA. “Set up a plan for a month, a week, and a day,” he said.

Another idea in terms of prioritizing would be to make your list based on whether it’s a critical safety issue, routine, has a specific time-line, such as creating a room for a new baby, or would simply improve the value or look of your home.

3. Be realistic regarding your skill-set.
I don’t think I’m alone in the notion that in order to save money, I have to do just about every project in the house myself. Yes, I’ve even managed a lot with the help of detailed books on repairs, but there is a point where you simply need to hire a professional, especially for code-heavy or dangerous work like electrical work. You will save time, money, and a great deal of stress. A colleague of mine who lives in New York City hired a plumber recently to do some work that she just couldn't do herself after wasting hours trying to DIY the job. It was worth it; she's no longer showering in ankle-deep water.

4. Pace yourself, multi-tasking doesn’t always get more done faster.
Tresnack said that when beginning a project to try to  not create too many smaller tasks.  “Even the most multi-tasking CEO’s focus on one thing at a time, following through without letting anything disrupt them,” he said. Tresnack said that the mind compartmentalizes each task and each time we fully complete a task, a part of our mind can relax. “When you have accomplished something the mind can breathe, rest, and let go of it. It’s like having too many Windows open on your computer, your mind gets slower and slower,” he said.

5. Become “prevention focused.”
“Prevention focus is a term psychologists use to describe what happens when you think about your goals in terms of what you might lose,” said Dr. Heidi Grant Halvorson in her blog “Peeling back the Onion.”

“Study after study shows that when people think about their goals in terms of what would happen if things go wrong, they procrastinate less,” said Halvorson.

6. Have attainable goals.
Similar to prioritizing, assessing your resources carefully, including your time, and prior to starting a project, will help flesh out what’s realistic. I’ve learned that when I lay out what’s really needed in terms of materials, time, and cost, I’m able to then have a clearer vision of the project, which tends to reduce what I think of as the “looming” aspect of the project and it becomes easier to move forward. Having attainable goals also helps me budget my time, another resistance-reducer.


7. Try to avoid perfectionism.
Perfectionism can lead to the noblest cause of procrastination. When I have created an image of not only what, but how much needs to be done, I’ve sometimes become too overwhelmed to actually do the project. Case in point, I had a room that had wallpaper I hated. In peeling off the wallpaper, the backing was left behind. In a 100-year-old house with plaster walls, getting the backing off and the room skim-coated and painted ended up taking nearly three years. In wanting it perfect right away, I just couldn’t get started.


8. Let go of the fear.
For those of you who are inclined towards introspection, Tresnack recommends sitting down before you start a project and try to focus on what about the project may be making you afraid. “If you are procrastinating, sit for a moment and look at what your fears are about the situation. You may even want to write about it,” he said. Tresnack said that procrastination creates an “emotional cloud, which makes things harder to accomplish.”

9. Celebrate your successes.
“Every time we accomplish something it gives our mind a little boost,” said Tresnack. It’s important to stop and relish what we have accomplished before moving on to the next project. If you feel more satisfaction, the next project may feel more enjoyable.

10. Make projects into social events.
There are always a lot of small projects that need to be done. But for the bigger projects, make it an excuse for a party or a date with your significant other. Having a work a party is not a new idea, but it’s a fun one. Not only can you get the project done faster, but you can build on the feeling of making work seem less like work.


To order your copy of Remodeling Hell, CLICK HERE
For more information about Remodeling Hell, CLICK HERE
To order a copy of my new book Murder on Kilimanjaro, CLICK HERE
For more information about the Summit Murder Mystery series, CLICK HERE
Follow me on TWITTER
Friend me on FACEBOOK
Connect with me on LINKEDIN
Subscribe to my YOUTUBE channe

Tuesday, December 11, 2012

Eight Tips for a Supremely Organized Winter Garage


Houzz_FlowWall_eclectic-garage-and-shed.jpg

Mountains of snow on the horizon mean that shovels, snow blowers, skis and more are about to come out of the woodwork. Prepare appropriately for the daily use of winter equipment and gear by getting your garage in tip-top shape now. An organized garage that acts as a functional storage space will keep everything you need at hand, allowing you to move through chores and errands with efficiency and ease. Optimize your garage space by following the below tips from the pros.

Plan accordingly. Before you make any move, assess your space carefully. Even if you want to do the dirty work yourself, you may want to call in a professional simply to help you create a working vision. “You want to understand exactly what your personal storage requirements are, and then design your garage accordingly to fit your needs,” says Jeff Murphy, president of Murphy and Co. Design “It’s amazing what a good design can do to the quality of life in your garage.”


Avoid general floor storage. First rule of thumb: Keep the garage floor as clear as possible. “Snow melting off your car will make anything left out wet and muddy,” says Rozalia Kiss, design manager at transForm


Work your walls. Use all the wall space available; this not only keeps things off the floor, but also leaves optimal space for your car. “Consider a wall track system to hang shovels and other tools in an easy-to-reach place by the garage door,” says Kiss. “For heavy, bulky items such as winter sports equipment, install deep garage shelving with metal stiffeners.”


Look up for general storage. Running out of available wall space? Use the ceiling. “There are many great companies that specialize in simple garage storage, including overhead storage that can mount on your current ceiling,” Murphy says.


Consider creating a gear closet. Murphy suggests creating a dedicated sports or gear closet out of a room accessed directly from the garage. “These spaces are simply a larger closet with shelves and open storage, which works great for unloading kids’ sports items right from a vehicle into a room where it doesn’t matter if it becomes wet or dirty,” he says. “This room is typically heated the same as the house.”


Hang racks for skis and snowboards. “Mounting a ski or snowboard rack on the wall is a nice way to keep the clutter down in the garage,” says Murphy. “It allows for a dedicated location to keep them off the floor and out of the way of tipping over.”


Keep sand and salt at hand. Use sliding wire baskets or install a tilt-out hamper for easy access to sand, salt and even (well-wrapped) birdseed. “This also helps to keep them protected, stored and off the floor all winter long,” says Kiss.


Install motion-sensor-activated and battery-powered LED lights. You never know when a winter storm might challenge your power, so it’s best to be prepared. “Motion-sense-activated and battery-powered LED lights help you find supplies in the event of a power outage and can be easily mounted under cabinets to illuminate countertops, and installed in drawers and closets,” says Kiss

Article source: http://www.foxnews.com/leisure/2012/11/27/8-tips-for-supremely-organized-winter-garage/ 

To order your copy of Remodeling Hell, CLICK HERE
For more information about Remodeling Hell, CLICK HERE
To order a copy of my new book Murder on Kilimanjaro, CLICK HERE
For more information about the Summit Murder Mystery series, CLICK HERE
Follow me on TWITTER
Friend me on FACEBOOK
Connect with me on LINKEDIN
Subscribe to my YOUTUBE channel