Monday, June 20, 2016

Tips to Stage Your Home to Sell

 
Put your best foot forward.

Make a good first impression.

First impressions are the most lasting.

What I’m trying to say is, when it comes to houses, prospective buyers are going to judge your house based on their first, two-second impression of it, whether or not they should.

When others make strong judgments based on first impressions, it’s usually seen as a negative. Instead, look at your home’s first impression as an opportunity for you to get a leg up on your competition by wowing potential homebuyers.

Home staging is setting your home up as a neutral space where buyers can easily imagine the drama of their life unfolding. Home staging doesn’t have to mean dropping 10 or 20 grand on remodeling. A lot of it is doing all the little things right – making your home appear as attractive as possible and then getting out of your own way so buyers can see how they, not you, would live in the home.

I asked Joe Delia with Keller Williams Royal Oak Market Place for tips on how to best stage your home for a quick sell.

The Basics

Listing Photos

Put some effort into the listing photos – maybe even hire a professional photographer. Buyers sort through many, many listings online. If your photos fail to grab their attention, they may not even give your home a chance.

Clean Up

Clean and tidy goes a long way. “When it’s dirty, people focus on that,” explains Delia. Clean isn’t enough – make your home spotless.

Declutter

The close cousin to clean and tidy is decluttering your home. People have a hard time envisioning their belongings in a home when it’s packed with someone else’s stuff.
The seller should remove as much clutter as possible. Less furniture makes the space look bigger. The furniture you do leave out should be up for entertaining. Make traffic flow obvious to buyers.

Depersonalize the Space

Removing personal items like family photos is another important thing to do. It’s hard for buyers to envision themselves in an empty home and equally as hard to envision themselves in a home full of someone else’s life and mementoes.

Make it Bright and Open

Lots of natural light and storage space are helpful too. Bright, open, refreshing and relaxing are some of the feelings potential buyers want to sense when walking through your home.

Decorating and Updating

Be Consistent

A consistent décor theme is more important than having all the newest updates/materials. A buyer should be able to come into your home and immediately sense a flow, an order to the home and be able to picture themselves in that flow, Delia states.
If you have some brushed nickel and some brass hardware in your home, for example, replace one or the other so that everything matches. Avoid a combination of styles, like ultra-modern and antique, as much as possible too. Decide on a look for your home and commit to it.
Putting in new cupboard or drawer fronts and hardware and repainting your home in neutral colors are some relatively cheap fixes that will significantly revitalize your home. Setting out fresh fruit or flowers greatly increases the appeal and hominess of your home, without making it feel personal to you.

Remodeling vs. Updating

You can go for more extensive remodeling like a whole kitchen or bathroom overhaul if you want, but just adding some nice furniture, art pieces or stainless steel appliances (that stay with the home) will be more cost effective in increasing your home’s appeal.
Make bedrooms as serene as possible; don’t make bedrooms gender specific. Update bathrooms including tub, shower and vanities, clean grimy walls, change fixtures, clean shower doors. Paint out dated tiles on bathroom walls.

Outdoor Tactics

Remember that first impression? It started with the images the buyer saw online and is largely cemented in their mind when they drive up to your home, so make it look great!
  • Power wash your driveway, deck, outside of home, etc.
  • Cut the grass regularly
  • Keep bushes and shrubs well-trimmed
  • Clear out weeds
  • Add flowers or other colorful accents to improve curb appeal
  • Get rid of any dead plants
The bottom line is that it’s absolutely worth spending some time, effort and a little money to increase the appeal of your home. At the same time, don’t think you need hardwood floors, granite countertops and vaulted ceilings to get people to look at your home.
To order your copy of Remodeling Hell, CLICK HERE
For more information about Remodeling Hell, CLICK HERE
For more information about the Summit Murder Mystery series, CLICK HERE
Follow me on TWITTER
Friend me on FACEBOOK
Follow me on PINTEREST

Wednesday, June 15, 2016

7 Remodeling Tips

Julie Laughton Designer and General Contractor 
 
This is the busiest time of year for remodels. Most homeowners like to start their remodel now so it is completed by the new school year and the holiday season. Summer is a convenient time for a family to travel while their home is being worked on.
The home remodel experience should be fun and rewarding. You are essentially getting a new home to meet your family’s lifestyle and needs without moving. However, you may have heard stories from friends and family whose remodel turned into a nightmare. For example, a job that was supposed to take six months to complete went on for over a year. Not only is your happiness about the remodel squashed, but you also have a bitter taste in your mouth and won’t feel the same about it in the end. The delays and the stress take the joy out of it. If your remodel needs to go on hold in the middle of the job, then the original budget goes out the window.
The keys to not having this happen are to know what to look for, who to hire, and see the warning signs. Here are 7 tips to help avoid a nightmare remodel.
1) Moving Out or Staying in Your Home: Are you prepared to either move out or stay and camp out while your remodel is being done? To move out means additional costs if you don’t have a second home to go to. To stay in your home means living with a temporary kitchen and in a more confined space with inevitable added stress.
2) Hiring the Essential Players: The architect, designer, space planner, kitchen and bath designer, and contractor are the four most essential players to the project. You should also be aware that hiring a professional educated interior designer who does space planning is much different than hiring a decorator who does furniture and drapes. You need the appropriate person to draw the plans because it is not only about the home’s design architecturally, but also how the space is designed and functions along with the overall style. Letting your contractor play designer doesn’t work.
3) Creating Good Plans: You need to have plans that work. This allows you to achieve a budget and stick to it. Sometimes a homeowner will think they hired the right person to draw them. However, the architect or designer who drew the plans has to understand city rules, residential design, and construction in general. They also need to understand space planning and kitchen design or the plans just won’t work. Even if the plans are complete but not everything is reviewed in advance, there will be surprises and added costs.
4) Making Decisions and Selections: For budget and timing reasons, all design decisions and material selections should be made in advance of starting the project. A well-known fact in all remodels is the “unknown” behind the walls. This cannot be avoided. The other unknown to the professionals is how the client will react and how many changes they will make “after” the jobs starts. My best advice to a client is if they have a budget, they want to stick to. Do not under any circumstances make changes or add to the scope of work after the work starts. It’s a nightmare of additional costs on top of delays.
5) Determining Your Style: It’s best to work with a professional designer to help guide you through this process. The professional design process is executed in a way that is supposed to allow you to see all the options and, at same time, fine-tune the options while establishing the style. In the end, it has to not only have style, but it also must function so it will all work for the homeowner. Getting there can be overwhelming and proper guidance is the key.
6) Avoiding the Owner-Builder Route: The biggest nightmare is when a homeowner starts their project without a permit or a plan. They try to hire all of the sub-contractors themselves as an owner-builder without hiring a contractor. They manage the project with no experience and think the process is easy because it’s their house. The risk to the homeowner is very high in this situation. A homeowner will usually spend much more time and money in the end if they choose to go the owner-builder route. Then it will be too late when they realize that they need a professional to take over and finish the job right.
7) Checking References: It’s amazing how many contractors aren’t who they say they are. You want to make sure that your contractor is legitimate: licensed, bonded, and insured. Actually check his license and make sure it’s valid. Check his references. Ask for proof of insurance. It’s illegal to work without it. If they don’t have it, then you stop.

To order your copy of Remodeling Hell, CLICK HERE
For more information about Remodeling Hell, CLICK HERE
For more information about the Summit Murder Mystery series, CLICK HERE
Follow me on TWITTER
Friend me on FACEBOOK
Follow me on PINTEREST

Thursday, May 12, 2016

Experts offer tips for homeowners thinking about remodeling


Experts offer tips for homeowners thinking about remodeling 
Laura Borchers

Many Central Ohio contractors say in the spring their business warms up. Now experts are offering tips to homeowners thinking about taking on a home remodeling project.

"Being in German Village and looking around at different houses, we felt this one had everything we were looking for,” said homeowner Angie Steinhauser. “But every room needed a facelift.”
Steinhauser and her partner Ziad Shaheen hired a contractor and went room-by-room replacing light fixtures, updating walls and in some cases, tearing out drywall.

“We had to tear out something we called the ‘Medusa light’ immediately,” said Shaheen. He went on to say remodeling was not easy. “Just living with contractors, in general. Not anything personal, just the clutter and mess that comes with all of that."

That is why the first piece of advice the couple offers to others is to be careful in selecting the companies who will help you renovate.

"We interviewed a lot of contractors,” said Steinhauser. “I think finding the right contractor who you're going to work well with can make a big difference."

The tip is echoed by Ohio Attorney General Mike DeWine. Days ago he filed a lawsuit against a home improvement contractor for failing to deliver promised services. The lawsuit accuses Columbus-based 5 Star Remodeling LLC and owner Robert Turnquest of violating Ohio’s Consumer Sales Practices Act.

In several consumer complaints, customers said they paid for home improvement work they never received and that the company did not provide refunds.

“In this case, we found that consumers paid thousands of dollars for work they never received,” Attorney General DeWine said. “We’re seeking recovery for affected consumers and protection for other consumers so they don’t experience the same problems.”  

Attorney General DeWine offered tips to avoid home improvement problems:
  • Research contractors carefully. Ask neighbors, friends, or family members for recommendations. Review complaints on file with the Ohio Attorney General’s Office and the Better Business Bureau. Check with the Ohio Secretary of State to confirm that the business is properly registered.
  • Get written estimates from several contractors before making a final decision. Be skeptical of an estimate that is much lower than others. If an offer sounds too good to be true, it probably is.
  • Read any documents a contractor gives you before signing them. Don’t rely on verbal claims. 
  • Be wary if you have to pay a large down payment, such as half of the total cost.
  • Make sure the written contract includes the start and end dates and an itemized list of all material costs, labor, and services.

To order your copy of Remodeling Hell, CLICK HERE
For more information about Remodeling Hell, CLICK HERE
For more information about the Summit Murder Mystery series, CLICK HERE
Follow me on TWITTER
Friend me on FACEBOOK
Follow me on PINTEREST
Thursday, April 28, 2016

Tips for building an outdoor kitchen for clients


Outdoor kitchens have been growing in popularity over the years. The benefit of learning how to build an outdoor kitchen is that the profit margins are traditionally higher than standard indoor kitchen remodels given that the select group of contractors with the skill of installing them is small and their services are in demand.

The outdoor kitchen is comprised of four distinct zones: the hot zone, which is where your grill, cook top and pizza oven goes; a wet zone, which is where your sink goes; a cold zone where you keep your cooler or refrigerator; and a dry zone, which is where you want to keep cooking and storage items dry.

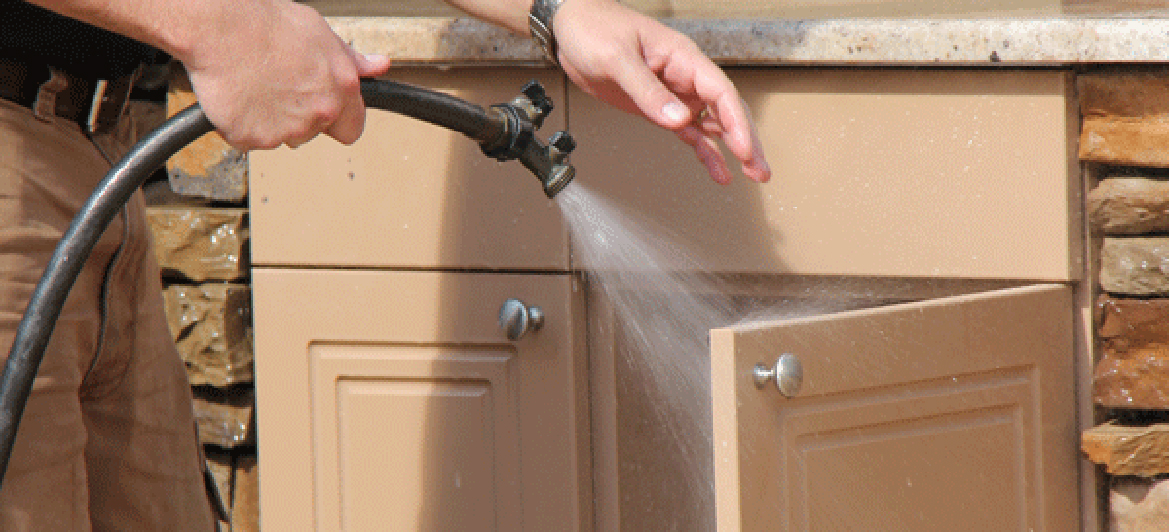
Of all the zones within the outdoor kitchen the dry zone requires the most specialized equipment. Special water-tight  and water-resistant cabinets will need to be put in to keep storage items dry. Among the offerings are NatureKast high-density resin and Werever marine-grade HDPE cabinetry that are so impervious you can clean them with a water hose. Kalamazoo also makes beautiful stainless steel cabinets and appliances for the outdoors.
 
Werever marine-grade cabinetry
In regards to appliances for an outdoor kitchen, Kalamazoo makes the nicest, most durable appliances you can buy. They make warming drawers and side burners. They even make outdoor dishwashers, which is a real luxury item if you think about it.

Another aspect of building an outdoor kitchen is to select the right grade of tile. Tiles that work best outside are high-grade porcelain tiles, which are nearly impervious to moisture, and quarry tiles that are highly durable in structure. Another building material you can consider working with is stained concrete with a durable layer of polymer coating.  If you choose to stamp the concrete you want a very low stamp level, which will make cracking less of likelihood. Also if you want to put wood deck flooring in your outdoor kitchen, pick the most water-impervious grade of wood you can. Epay wood is a highly recommended outdoor wood flooring option. Remember sourcing the most durable materials you can and paying more initially is better in the long run as the life of the kitchen can be extended into many decades of time.

Although many keep the outdoor kitchen as closely adjacent to the indoor one as possible, it should not be relegated to just the backyard. You can put outdoor kitchens on the roof as well.
Building an outdoor kitchen is not a necessity but it is a luxury symbol. Many homeowners appreciate what an outdoor kitchen can provide in terms of entertaining guests, and may be eager to have one custom built.

To order your copy of Remodeling Hell, CLICK HERE
For more information about Remodeling Hell, CLICK HERE
For more information about the Summit Murder Mystery series, CLICK HERE
Follow me on TWITTER
Friend me on FACEBOOK
Follow me on PINTEREST

Friday, April 22, 2016

6 spring chores to do now to protect your home's value

As of early Sunday morning on the East Coast, spring officially has sprung. But before you break out in your happy dance, you've got some work to do.   To protect what's probably your biggest investment, it's important to take care of a few spring chores. Nino Sitchinava — principal economist at Houzz.com, a leading platform for home remodeling and design — offers her top tips for getting your property back in shape after winter:
1. Tackle any drainage issues. The 2016 Houzz Landscaping Trends study revealed that drainage issues are the top challenge homeowners face when updating their yards. After winter, you likely know where excess water pools around your home. Spring is the best time to fix this to avoid erosion and mold issues.

2. Fix a leaking roof. During winter, it's common to patch or tarp a roof as a temporary fix for leaks, but now is the time to resolve issues for good. According to the 2015 Houzz & Home study, which had more than 170,000 respondents in the U.S.,  homeowners are nearly two times more likely to remodel their kitchen (27%) than roofing (15%), an important update when needed. "Fixing leaks and maintenance repairs should be prioritized ahead of other remodeling," Sitchinava says. "Leaks can cause problems like pests and mold. Often these repairs are also lower budget and require less planning."
3. Refresh your entry or mudroom. During winter, you're likely to track snow, road salt and mud into your entry or mudroom. In spring, make sure to thoroughly clean your walls, floors and doors to avoid any long-term damage.

4. Clean and repair gutters. Winter debris can build in gutters, and it's important to remove it before spring rains. To avoid water running down the side of your home, check for places where the gutters may have pulled away from the house. "Termites and other pests, which become most active during this time of year, are attracted to moisture," Sitchinava says. "Standing water can create mold issues and cracks in driveways and paths create tripping hazards."

5. Clean siding. Similar to your entry or mudroom, salt and mud can build up on the exterior of your home during the winter. Depending on the type of siding, you can use a hose or pressure washer to clean your siding.

6. Update paths and your driveway. Often driveways and paths crack during the winter, especially in regions that experience freezing conditions. During landscaping projects, more than half of homeowners update their paths (51%) and 17% update their driveways, according to the 2016 Houzz Landscaping Trends study.

"Often, it's not an option to resolve these issues during the winter because it's too cold to have workers on site and there may still be snow on the ground in colder climates. So, it's important to address them ASAP in the spring."

To order your copy of Remodeling Hell, CLICK HERE
For more information about Remodeling Hell, CLICK HERE
For more information about the Summit Murder Mystery series, CLICK HERE
Follow me on TWITTER
Friend me on FACEBOOK
Follow me on PINTEREST

Tuesday, April 19, 2016

Tips for building an outdoor kitchen for clients


Outdoor kitchens have been growing in popularity over the years. The benefit of learning how to build an outdoor kitchen is that the profit margins are traditionally higher than standard indoor kitchen remodels given that the select group of contractors with the skill of installing them is small and their services are in demand.

The outdoor kitchen is comprised of four distinct zones: the hot zone, which is where your grill, cook top and pizza oven goes; a wet zone, which is where your sink goes; a cold zone where you keep your cooler or refrigerator; and a dry zone, which is where you want to keep cooking and storage items dry.

Of all the zones within the outdoor kitchen the dry zone requires the most specialized equipment. Special water-tight  and water-resistant cabinets will need to be put in to keep storage items dry. Among the offerings are NatureKast high-density resin and Werever marine-grade HDPE cabinetry that are so impervious you can clean them with a water hose. Kalamazoo also makes beautiful stainless steel cabinets and appliances for the outdoors.
 
Werever marine-grade cabinetry
In regards to appliances for an outdoor kitchen, Kalamazoo makes the nicest, most durable appliances you can buy. They make warming drawers and side burners. They even make outdoor dishwashers, which is a real luxury item if you think about it.

Another aspect of building an outdoor kitchen is to select the right grade of tile. Tiles that work best outside are high-grade porcelain tiles, which are nearly impervious to moisture, and quarry tiles that are highly durable in structure. Another building material you can consider working with is stained concrete with a durable layer of polymer coating.  If you choose to stamp the concrete you want a very low stamp level, which will make cracking less of likelihood. Also if you want to put wood deck flooring in your outdoor kitchen, pick the most water-impervious grade of wood you can. Epay wood is a highly recommended outdoor wood flooring option. Remember sourcing the most durable materials you can and paying more initially is better in the long run as the life of the kitchen can be extended into many decades of time.

Although many keep the outdoor kitchen as closely adjacent to the indoor one as possible, it should not be relegated to just the backyard. You can put outdoor kitchens on the roof as well.
Building an outdoor kitchen is not a necessity but it is a luxury symbol. Many homeowners appreciate what an outdoor kitchen can provide in terms of entertaining guests, and may be eager to have one custom built.

To order your copy of Remodeling Hell, CLICK HERE
For more information about Remodeling Hell, CLICK HERE
For more information about the Summit Murder Mystery series, CLICK HERE
Follow me on TWITTER
Friend me on FACEBOOK
Follow me on PINTEREST

Friday, April 1, 2016

6 spring chores to do now to protect your home's value


376 246 LINKEDIN 3 COMMENTMORE
As of early Sunday morning on the East Coast, spring officially has sprung. But before you break out in your happy dance, you've got some work to do.   To protect what's probably your biggest investment, it's important to take care of a few spring chores. Nino Sitchinava — principal economist at Houzz.com, a leading platform for home remodeling and design — offers her top tips for getting your property back in shape after winter:
1. Tackle any drainage issues. The 2016 Houzz Landscaping Trends study revealed that drainage issues are the top challenge homeowners face when updating their yards. After winter, you likely know where excess water pools around your home. Spring is the best time to fix this to avoid erosion and mold issues.
2. Fix a leaking roof. During winter, it's common to patch or tarp a roof as a temporary fix for leaks, but now is the time to resolve issues for good. According to the 2015 Houzz & Home study, which had more than 170,000 respondents in the U.S.,  homeowners are nearly two times more likely to remodel their kitchen (27%) than roofing (15%), an important update when needed. "Fixing leaks and maintenance repairs should be prioritized ahead of other remodeling," Sitchinava says. "Leaks can cause problems like pests and mold. Often these repairs are also lower budget and require less planning."
3. Refresh your entry or mudroom. During winter, you're likely to track snow, road salt and mud into your entry or mudroom. In spring, make sure to thoroughly clean your walls, floors and doors to avoid any long-term damage.
4. Clean and repair gutters. Winter debris can build in gutters, and it's important to remove it before spring rains. To avoid water running down the side of your home, check for places where the gutters may have pulled away from the house. "Termites and other pests, which become most active during this time of year, are attracted to moisture," Sitchinava says. "Standing water can create mold issues and cracks in driveways and paths create tripping hazards."
5. Clean siding. Similar to your entry or mudroom, salt and mud can build up on the exterior of your home during the winter. Depending on the type of siding, you can use a hose or pressure washer to clean your siding.
6. Update paths and your driveway. Often driveways and paths crack during the winter, especially in regions that experience freezing conditions. During landscaping projects, more than half of homeowners update their paths (51%) and 17% update their driveways, according to the 2016 Houzz Landscaping Trends study.
"Often, it's not an option to resolve these issues during the winter because it's too cold to have workers on site and there may still be snow on the ground in colder climates. So, it's important to address them ASAP in the spring."

To order your copy of Remodeling Hell, CLICK HERE
For more information about Remodeling Hell, CLICK HERE
For more information about the Summit Murder Mystery series, CLICK HERE
Follow me on TWITTER
Friend me on FACEBOOK
Follow me on PINTEREST